Как создать кнопку программно?
Как программно создавать графические элементы (например, UIButton) в Swift? Я попытался создать и добавить кнопку в представление, но не смог.
22 ответа
Вот полное решение для программного добавления UIButton с targetAction.
Swift 2.2
override func viewDidLoad() {
super.viewDidLoad()
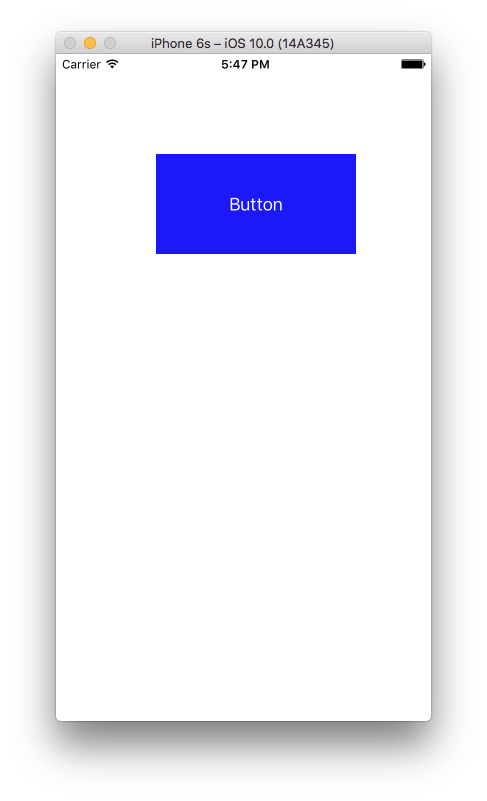
let button = UIButton(frame: CGRect(x: 100, y: 100, width: 100, height: 50))
button.backgroundColor = .greenColor()
button.setTitle("Test Button", forState: .Normal)
button.addTarget(self, action: #selector(buttonAction), forControlEvents: .TouchUpInside)
self.view.addSubview(button)
}
func buttonAction(sender: UIButton!) {
print("Button tapped")
}
Вероятно, лучше использовать NSLayoutConstraint а не frame чтобы правильно разместить кнопку для каждого экрана iPhone.
Обновлен код до Swift 3.1:
override func viewDidLoad() {
  super.viewDidLoad()

  let button = UIButton(frame: CGRect(x: 100, y: 100, width: 100, height: 50))
  button.backgroundColor = .green
  button.setTitle("Test Button", for: .normal)
  button.addTarget(self, action: #selector(buttonAction), for: .touchUpInside)

  self.view.addSubview(button)
}

func buttonAction(sender: UIButton!) {
  print("Button tapped")
}
Обновлен код до Swift 4.2:
override func viewDidLoad() {
  super.viewDidLoad()

  let button = UIButton(frame: CGRect(x: 100, y: 100, width: 100, height: 50))
  button.backgroundColor = .green
  button.setTitle("Test Button", for: .normal)
  button.addTarget(self, action: #selector(buttonAction), for: .touchUpInside)

  self.view.addSubview(button)
}

@objc func buttonAction(sender: UIButton!) {
  print("Button tapped")
}
Выше все еще работает, если func buttonAction объявлен private или internal.
-
3и не забывайте, что ваш целевой класс должен быть производным от NSObjectAlexey Globchastyy
-
6и не забывайте, что функция, которая является вашим действием, не может быть частнойPablo Zbigy Jablonski
Вы можете программным образом добавлять UIButton, UIlable и UITextfield таким образом.
Код UIButton
// var button   = UIButton.buttonWithType(UIButtonType.System) as UIButton
let button = UIButton(type: .System) // let preferred over var here
button.frame = CGRectMake(100, 100, 100, 50)
button.backgroundColor = UIColor.greenColor()
button.setTitle("Button", forState: UIControlState.Normal)
button.addTarget(self, action: "Action:", forControlEvents: UIControlEvents.TouchUpInside)
self.view.addSubview(button)
Код UILabel
var label: UILabel = UILabel()
label.frame = CGRectMake(50, 50, 200, 21)
label.backgroundColor = UIColor.blackColor()
label.textColor = UIColor.whiteColor()
label.textAlignment = NSTextAlignment.Center
label.text = "test label"
self.view.addSubview(label)
Код UITextField
var txtField: UITextField = UITextField()
txtField.frame = CGRectMake(50, 70, 200, 30)
txtField.backgroundColor = UIColor.grayColor()
self.view.addSubview(txtField)
Надеюсь, это поможет вам.
-
0Итак, зачем вам оператор «as» в первой строке кода, которым вы поделились перед UIButton ...?
-
0buttonWithType возвращает тип AnyObject, поэтому вам нужно привести его как UIButton
Для Swift 3
let button = UIButton()
button.frame = CGRect(x: self.view.frame.size.width - 60, y: 60, width: 50, height: 50)
button.backgroundColor = UIColor.red
button.setTitle("Name your Button ", for: .normal)
button.addTarget(self, action: #selector(buttonAction), for: .touchUpInside)
self.view.addSubview(button)

func buttonAction(sender: UIButton!) {
    print("Button tapped")
}
Для Swift 4
 let button = UIButton()
 button.frame = CGRect(x: self.view.frame.size.width - 60, y: 60, width: 50, height: 50)
 button.backgroundColor = UIColor.red
 button.setTitle("Name your Button ", for: .normal)
 button.addTarget(self, action: #selector(buttonAction), for: .touchUpInside)
 self.view.addSubview(button)

 @objc func buttonAction(sender: UIButton!) {
    print("Button tapped")
 }
-
0
button.frame = (frame: CGRect(x: self.view.frame.size.width - 60, y: 20, width: 50, height: 50))должно бытьbutton.frame = CGRect(x: self.view.frame.size.width - 60, y: 20, width: 50, height: 50) -
2В Swift 4 перед «func» необходимо добавить «@objc».
Swift 3
let btn = UIButton(type: .custom) as UIButton
btn.backgroundColor = .blue
btn.setTitle("Button", for: .normal)
btn.frame = CGRect(x: 100, y: 100, width: 200, height: 100)
btn.addTarget(self, action: #selector(clickMe), for: .touchUpInside)
self.view.addSubview(btn)

func clickMe(sender:UIButton!) {
  print("Button Clicked")
}
Выход
-
0Спасибо, m8! Начиная с Swift сегодня, так что все странно (:
Как это сделать, используя Swift 3.0.
func createButton() {
    let button = UIButton(type: .system)
    button.frame = CGRect(x: 100.0, y: 100.0, width: 100.0, height: 100.0)
    button.setTitle(NSLocalizedString("Button", comment: "Button"), for: .normal)
    button.backgroundColor = .green
    button.addTarget(self, action: #selector(buttonAction(sender:)), for: .touchUpInside)
    view.addSubview(button)
}

@objc func buttonAction(sender: UIButton) {
    print("Button pushed")
}
 var sampleButton:UIButton?

 override func viewDidLoad() {
  super.viewDidLoad()

 }
 override func viewDidAppear(animated: Bool) {

  sampleButton = UIButton(type: .RoundedRect)
  //sampleButton.frame = CGRect(x:50, y:500, width:70, height:50)

  sampleButton!.setTitle("Sample \n UI Button", forState: .Normal)
  sampleButton!.titleLabel?.lineBreakMode = .ByWordWrapping
  sampleButton!.titleLabel?.textAlignment = .Center
  sampleButton!.setTitleColor(UIColor.whiteColor(), forState: .Normal)
  sampleButton!.layer.cornerRadius = 6
  sampleButton!.backgroundColor = UIColor.redColor().colorWithAlphaComponent(0.6)
  sampleButton?.tintColor =  UIColor.brownColor()


  //Add padding around text
  sampleButton!.titleEdgeInsets = UIEdgeInsetsMake(-10,-10,-10,-10)
  sampleButton!.contentEdgeInsets = UIEdgeInsetsMake(5,5,5,5)

  //Action set up
  sampleButton!.addTarget(self, action: "sampleButtonClicked", forControlEvents: .TouchUpInside)
  self.view.addSubview(sampleButton!)


  //Button Constraints:
  sampleButton!.translatesAutoresizingMaskIntoConstraints = false

  //To anchor above the tab bar on the bottom of the screen:
  let bottomButtonConstraint = sampleButton!.bottomAnchor.constraintEqualToAnchor(bottomLayoutGuide.topAnchor, constant: -20)

  //edge of the screen in InterfaceBuilder:
  let margins = view.layoutMarginsGuide
  let leadingButtonConstraint = sampleButton!.leadingAnchor.constraintEqualToAnchor(margins.leadingAnchor)

  bottomButtonConstraint.active = true
  leadingButtonConstraint.active = true


 }
 func sampleButtonClicked(){

  print("sample Button Clicked")

 }
API не изменился - только синтаксис имеет. Вы можете сделать UIButton и добавить его следующим образом:
var button = UIButton(frame: CGRectMake(0, 0, 50, 50))
self.view.addSubview(button) // assuming you're in a view controller
В Swift 2 и iOS 9.2.1
var button: UIButton = UIButton(type: UIButtonType.Custom) as UIButton
self.button.frame = CGRectMake(130, 70, 60, 20)
self.button.setTitle("custom button", forState: UIControlState.Normal)
self.button.addTarget(self, action:"buttonActionFuncName", forControlEvents: UIControlEvents.TouchUpInside)
self.button.setTitleColor(UIColor.blackColor(), forState: .Normal)
self.button.layer.borderColor = UIColor.blackColor().CGColor
self.button.titleLabel?.font = UIFont(name: "Helvetica-Bold", size: 13)
self.view.addSubview(self.button)
Добавьте этот код в viewDidLoad
// добавить кнопку
            var button=UIButton(frame: CGRectMake(150, 240, 75, 30))
            button.setTitle("Next", forState: UIControlState.Normal)
            button.addTarget(self, action: "buttonTapAction:", forControlEvents: UIControlEvents.TouchUpInside)
            button.backgroundColor = UIColor.greenColor()
            self.view.addSubview(button)
Запишите эту функцию за ее пределами, это вызовет, когда вы нажмете на кнопку
func buttonTapAction(sender:UIButton!)
{
    println("Button is working")
}
Вы можете создать подобное, и вы можете добавить действие так же, как это....
import UIKit

let myButton = UIButton(frame: CGRect(x: 0, y: 0, width: 50, height: 50))

init(nibName nibNameOrNil: String!, bundle nibBundleOrNil: NSBundle!)
{       super.init(nibName: nibName, bundle: nibBundle)
        myButton.targetForAction("tappedButton:", withSender: self)
}

func tappedButton(sender: UIButton!)
{
     println("tapped button")
}
-
0извините, но компилятор отправил ошибку в строке - self.view.addSubview (view: myButton). Ошибка следующая: «Метка постороннего аргумента 'view:' in call"
-
0Пожалуйста, удалите эту строку self.view.addSubview (view: myButton) Для получения дополнительной информации см. Мой отредактированный ответ.
Это возможно. Вы делаете все почти так же, за исключением использования быстрого синтаксиса. Например, вы можете сделать UIButton в коде следующим образом:
var button: UIButton = UIButton(frame: CGRectMake(0, 0, 100, 100))
            let myFirstButton = UIButton()
            myFirstButton.setTitle("Software Button", forState: .Normal)
            myFirstButton.setTitleColor(UIColor.redColor(), forState: .Normal)
            myFirstButton.frame = CGRectMake(100, 300, 150, 50)
            myFirstButton.backgroundColor = UIColor.purpleColor()
            myFirstButton.layer.cornerRadius = 14
            myFirstButton.addTarget(self, action: "pressed:", forControlEvents: .TouchUpInside)
            self.view.addSubview(myFirstButton)
            myFirstButton.hidden=true
            nameText.delegate = self


func pressed(sender: UIButton!) {
        var alertView = UIAlertView()
        alertView.addButtonWithTitle("Ok")
        alertView.title = "title"
        alertView.message = "message"
        alertView.show();
    }
Для создания UIButton из раскадровки: 1 - Перетащите объект UIButton из библиотеки объектов в ViewController в файл раскадровки 2 - Показать помощник редактора 3 - Перетащите правой кнопкой мыши из UIButton, создайте выше в своем классе. В результате получится следующее:
@IBAction func buttonActionFromStoryboard(sender: UIButton)
{
    println("Button Action From Storyboard")
}
Для создания UIButton программно: 1- Записать в "override func viewDidLoad()":
        let uiButton    = UIButton.buttonWithType(UIButtonType.System) as UIButton
        uiButton.frame  = CGRectMake(16, 116, 288, 30)
        uiButton.setTitle("Second", forState: UIControlState.Normal);
        uiButton.addTarget(self, action: "buttonActionFromCode:", forControlEvents: UIControlEvents.TouchUpInside)
        self.view.addSubview(uiButton)
2- добавьте функцию IBAction:
@IBAction func buttonActionFromCode(sender:UIButton)
{
    println("Button Action From Code")
}
-
0Начиная с версии Swift 1.2, более нельзя выполнять «as», их нужно «принудительно завершать» с помощью «as!».
Да, в симуляторе. Иногда он не распознает селектор, есть ошибка. Даже я столкнулся не с вашим кодом, а потом просто изменил название действия (селектор). Он работает
let buttonPuzzle:UIButton = UIButton(frame: CGRectMake(100, 400, 100, 50))
buttonPuzzle.backgroundColor = UIColor.greenColor()
buttonPuzzle.setTitle("Puzzle", forState: UIControlState.Normal)
buttonPuzzle.addTarget(self, action: "buttonAction:", forControlEvents: UIControlEvents.TouchUpInside)
buttonPuzzle.tag = 22;
self.view.addSubview(buttonPuzzle)
Функция выбора здесь:
func buttonAction(sender:UIButton!)
{

    var btnsendtag:UIButton = sender
    if btnsendtag.tag == 22 {
        //println("Button tapped tag 22")
    }
}
-
0Похоже, я сталкиваюсь с той же проблемой. Сначала я создал кнопку IBAction в раскадровке, но получаю «нераспознанный селектор, отправленный экземпляру», затем удаляю созданный таким образом IBAction и пытался использовать .addTarget, они оба приводят к одной и той же ошибке.
-
0Для меня сработало удаление всего кода IBOutlet и IBAction в файле .swift и всех соединений в InterfaceBuilder. Тогда воссоздай все.
Это работает для меня очень хорошо, #DynamicButtonEvent #IOS #Swift #Xcode
func setupButtonMap(){
    let mapButton = UIButton(type: .system)
    mapButton.setImage(#imageLiteral(resourceName: "CreateTrip").withRenderingMode(.alwaysOriginal), for: .normal)
    mapButton.frame = CGRect(x: 0, y: 0, width: 34, height: 34)
    mapButton.contentMode = .scaleAspectFit
    mapButton.backgroundColor = UIColor.clear
    mapButton.addTarget(self, action: #selector(ViewController.btnOpenMap(_:)), for: .touchUpInside)
    navigationItem.leftBarButtonItem = UIBarButtonItem(customView: mapButton)
    }
@IBAction func btnOpenMap(_ sender: Any?) {
    print("Successful")
}
    // UILabel:
    let label = UILabel()
    label.frame = CGRectMake(35, 100, 250, 30)
    label.textColor = UIColor.blackColor()
    label.textAlignment = NSTextAlignment.Center
    label.text = "Hello World"
    self.view.addSubview(label)

    // UIButton:
    let btn: UIButton = UIButton(type: UIButtonType.Custom) as UIButton
    btn.frame = CGRectMake(130, 70, 60, 20)
    btn.setTitle("Click", forState: UIControlState.Normal)
    btn.setTitleColor(UIColor.blackColor(), forState: .Normal)
    btn.addTarget(self, action:Selector("clickAction"), forControlEvents: UIControlEvents.TouchUpInside)
    view.addSubview(btn)


    // Button Action:
    @IBAction func clickAction(sender:AnyObject)
    {
        print("Click Action")
    }
override func viewDidLoad() {
    super.viewDidLoad()
        let myButton = UIButton(frame: CGRect(x: 100, y: 100, width: 100, height: 50))
        myButton.backgroundColor = .green
        myButton.setTitle("Hello UIButton", for: .normal)
        myButton.addTarget(self, action: #selector(myButtonAction), for: .touchUpInside)
        self.view.addSubview(myButton)
}
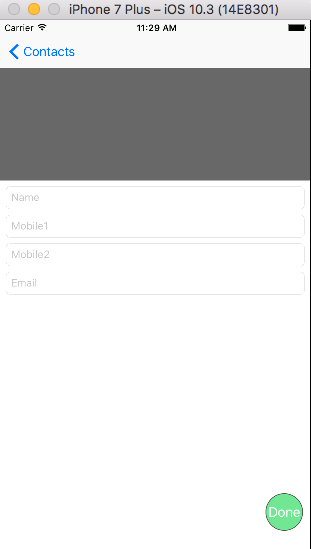
 func viewDidLoad(){
                    saveActionButton = UIButton(frame: CGRect(x: self.view.frame.size.width - 60, y: 0, width: 50, height: 50))
                    self.saveActionButton.backgroundColor = UIColor(red: 76/255, green: 217/255, blue: 100/255, alpha: 0.7)
                    saveActionButton.addTarget(self, action: #selector(doneAction), for: .touchUpInside)
                    self.saveActionButton.setTitle("Done", for: .normal)
                    self.saveActionButton.layer.cornerRadius = self.saveActionButton.frame.size.width / 2
                    self.saveActionButton.layer.borderColor = UIColor.darkGray.cgColor
                    self.saveActionButton.layer.borderWidth = 1
                    self.saveActionButton.center.y = self.view.frame.size.height - 80
                    self.view.addSubview(saveActionButton)
        }

          func doneAction(){
          print("Write your own logic")
         }
Шаг 1: создайте новый проект
Шаг 2: в ViewController.swift
import UIKit

class ViewController: UIViewController {

    override func viewDidLoad() {
        super.viewDidLoad()

        // CODE
        let btn = UIButton(type: UIButtonType.System) as UIButton
        btn.backgroundColor = UIColor.blueColor()
        btn.setTitle("CALL TPT AGENT", forState: UIControlState.Normal)
        btn.frame = CGRectMake(100, 100, 200, 100)
        btn.addTarget(self, action: "clickMe:", forControlEvents: UIControlEvents.TouchUpInside)
        self.view.addSubview(btn)

    }

    func clickMe(sender:UIButton!) {
      print("CALL")
    }

    override func didReceiveMemoryWarning() {
        super.didReceiveMemoryWarning()
        // Dispose of any resources that can be recreated.
    }


}
Uilabel code

var label: UILabel = UILabel()
label.frame = CGRectMake(50, 50, 200, 21)
label.backgroundColor = UIColor.blackColor()
label.textColor = UIColor.whiteColor()
label.textAlignment = NSTextAlignment.Center
label.text = "test label"
self.view.addSubview(label)
-
2Всегда рекомендуется добавить некоторые пояснения к вашему коду
Swift: кнопка Ui создает программно
let myButton = UIButton()

myButton.titleLabel!.frame = CGRectMake(15, 54, 300, 500)
myButton.titleLabel!.text = "Button Label"
myButton.titleLabel!.textColor = UIColor.redColor()
myButton.titleLabel!.textAlignment = .Center
self.view.addSubview(myButton)
override func viewDidLoad() {

super.viewDidLoad()
    // Do any additional setup after loading the view, typically from a nib.

    var imageView = UIImageView(frame: CGRectMake(100, 150, 150, 150));
    var image = UIImage(named: "BattleMapSplashScreen.png");
    imageView.image = image;
    self.view.addSubview(imageView);

}
Ещё вопросы
- 0Google App Engine dns_get_record
- 0Кеширование с JSP и HTML5: как отключить кеширование на стороне сервера
- 1текст Jlabel становится обрезанным при печати
- 0jquery найти ближайший элемент с известным братом
- 0Изменение данных контроллера с помощью директив AngularJS
- 0cPanel PHP 5.1 до 5.4 изменить, заголовок (расположение: index.php)
- 0GitLab CI: мое тестовое задание не принимает контейнер mysql
- 0Почему HTML 5 Canvas не рисует содержимое изображения?
- 0IE8 & 9 - нет объекта ответа jquery ajax
- 0$ cordovaInAppBrowser не работает на Android с ngCordova и Ionic
- 0Сделайте все экземпляры части слова курсивом
- 0Индекс не непрерывного массива
- 1Событие по щелчку в надстройке, созданной с помощью «yo office», вызывается для всех открытых документов
- 0Spring Data: findByEntityNot () во многих отношениях
- 0Функция AngularJS ng-click не работает после содержимого информационного окна $ compile map
- 1C # / Excel - Получить имя ячейки с OleDb
- 0angularjs app.service (…) вызывает «Uncaught TypeError: undefined не является функцией»
- 0извлечение элемента массива из присоединенного DQL-запроса в symfony2
- 1Включить / отключить все входы и флажки с любым флажком
- 1Robot Framework, расширяющий селен для обработки элемента нагрузки
- 1Снимок экрана устройства Android, отключение записи экрана
- 1Identity Toolkit API ранее не использовался в проекте или он отключен
- 0переменная и ее родительская область видимости внутри нг-если
- 1Как: Сортировать элементы DataGrid
- 0сравнить два входных значения в проверке входных данных HTML JavaScript?
- 0Часть указателей на интерфейс для абстракций запросов MySQL
- 0MYSQL - СОЗДАТЬ столбцы таблицы поиска в одну строку
- 1Как получить атрибут строки doc свойства?
- 0Могу ли я сделать этот PDO короче
- 0активация многоуровневого меню
- 1Как разрешить передачу пустого значения в MVC WebApi для двойного типа
- 1Компонент сценария служб SSIS - процесс 1 строки из Json в таблицу
- 1C # добавление в список кортежей с функцией
- 0Как выбрать ресурс с условием выполнения двух отношений в объединенной таблице
- 0MySQL 5.7 изменяет блокировку оператора DDL таблицы, но должна допускать одновременный DML
- 0Значение переменной $ scope не обновляется в контроллере Angular JS?
- 0Apache2 не получают правильный путь
- 1Решить несколько запросов на повышение
- 0SQL - возвращение строки с наибольшим количеством
- 0Выберите максимум, сгруппированный по годам
- 0номер перезапуска для класса img, используя jquery
- 0Обязательно ли использовать кладку на контейнере div?
- 0Время удержания в базе данных: STRING vs TIMESTAMP
- 1Есть ли способ применить метод finalize ()?
- 0Бинарный столбец SQL, если пользователь играл
- 0Несколько HTML-форму и отправить
- 0массивы, removeFirst () не работает?
- 1Элемент управления <DNN: ICON> не поддерживает CssClass
- 0Как использовать VBA для изменения «проверенного» свойства переключателей на веб-странице
- 1Android Studio не может разрешить ресурсы для пользовательских представлений в предварительном просмотре макета
