Как выровнять виды внизу экрана?
Здесь мой код макета;
<?xml version="1.0" encoding="utf-8"?>
<LinearLayout xmlns:android="http://schemas.android.com/apk/res/android"
    android:orientation="vertical"
    android:layout_width="fill_parent"
    android:layout_height="fill_parent">

    <TextView android:text="@string/welcome"
        android:id="@+id/TextView"
        android:layout_width="fill_parent"
        android:layout_height="wrap_content">
    </TextView>

    <LinearLayout android:id="@+id/LinearLayout"
        android:orientation="horizontal"
        android:layout_width="wrap_content"
        android:layout_height="wrap_content"
        android:gravity="bottom">

            <EditText android:id="@+id/EditText"
                android:layout_width="fill_parent"
                android:layout_height="wrap_content">
            </EditText>

            <Button android:text="@string/label_submit_button"
                android:id="@+id/Button"
                android:layout_width="wrap_content"
                android:layout_height="wrap_content">
            </Button>

    </LinearLayout>

</LinearLayout>
Похоже, что это слева, и я хочу, чтобы он выглядел справа.
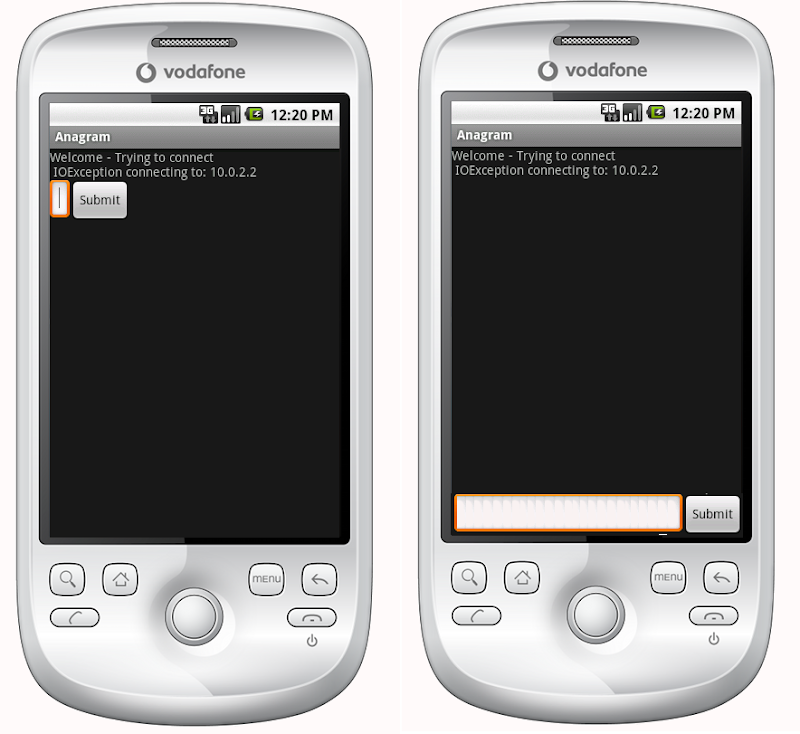
Очевидным ответом является установка TextView на fill_parent по высоте, но это не оставляет места для кнопки или поля ввода. По сути, проблема заключается в том, что я хочу, чтобы кнопка отправки и текстовая запись были фиксированной высотой внизу и текстовым видом, чтобы заполнить остальную часть пространства, аналогично горизонтальной линейной компоновке. Я хочу, чтобы кнопка отправки обернула ее содержимое и для ввода текста, чтобы заполнить остальную часть пространства.
Если первый элемент в линейной компоновке сказал fill_parent, он делает именно это, не оставляя места для других предметов, как мне получить элемент, который первым в линейном макете, чтобы заполнить все пространство, кроме минимума, необходимого для остальные элементы в макете?
EDIT:
Относительные макеты действительно были ответом - Спасибо!
    <?xml version="1.0" encoding="utf-8"?>
    <RelativeLayout
    xmlns:android="http://schemas.android.com/apk/res/android"
    android:layout_width="fill_parent"
    android:layout_height="fill_parent">

    <TextView
        android:text="@string/welcome"
        android:id="@+id/TextView"
        android:layout_width="fill_parent"
        android:layout_height="wrap_content"
        android:layout_alignParentTop="true">
    </TextView>

    <RelativeLayout
        android:id="@+id/InnerRelativeLayout"
        android:layout_width="wrap_content"
        android:layout_height="wrap_content"
        android:layout_alignParentBottom="true" >

        <Button
            android:text="@string/label_submit_button"
            android:id="@+id/Button"
            android:layout_alignParentRight="true"
            android:layout_width="wrap_content"
            android:layout_height="wrap_content">
        </Button>

        <EditText
            android:id="@+id/EditText"
            android:layout_width="fill_parent"
            android:layout_toLeftOf="@id/Button"
            android:layout_height="wrap_content">
        </EditText>

    </RelativeLayout>

</RelativeLayout>
-
6Как вы создали эти скриншоты?oneself
-
7@oneself Paint;) Я использую скин на эмуляторе, хотя любезно предоставлено Tea Vui Huang teavuihuang.com/androidgav
18 ответов
Я думаю, вы должны попробовать относительный макет.
Если у вас есть относительный макет, заполняющий весь экран, вы можете использовать android:layout_alignParentBottom, чтобы переместить кнопку в нижней части экрана.
Если ваши представления внизу не показаны в относительном макете, то, возможно, макет над ним занимает все пространство. В этом случае вы можете поместить представление, которое должно быть внизу, сначала в вашем файле макета, и расположите остальную часть макета над представлениями с помощью android:layout_above. Это позволяет нижнему виду занять столько места, сколько потребуется, а остальная часть макета может заполнить всю оставшуюся часть экрана.
-
4К вашему сведению: это не будет работать внутри ScrollView. Это проблема, с которой я сталкиваюсь сейчас. См. Stackoverflow.com/questions/3126347/…
-
6Это верно, ScrollViews и Relative Layouts не очень хорошо сочетаются. Если вам нужно много контента, чтобы отобразить все на одной странице, просто используйте линейный макет и поместите в нижний вид в последнюю очередь. Если вы хотите, чтобы представление отображалось последним в представлении прокрутки на небольших экранах и в нижней части страницы на более крупных телефонах, рассмотрите возможность использования различных файлов макетов и использования классификаторов ресурсов, чтобы устройство могло выбрать правильный файл макета.
В ScrollView это не работает, так как RelativeLayout будет перекрывать все, что находится в ScrollView в нижней части страницы.
Я исправил его с помощью динамического растяжения FrameLayout:
<ScrollView
    xmlns:android="http://schemas.android.com/apk/res/android"
    android:layout_height="match_parent"
    android:layout_width="match_parent"
    android:fillViewport="true">
    <LinearLayout
        android:id="@+id/LinearLayout01"
        android:layout_width="match_parent"
        android:layout_height="match_parent"
        xmlns:android="http://schemas.android.com/apk/res/android"
        android:orientation="vertical">

                <!-- content goes here -->

                <!-- stretching frame layout, using layout_weight -->
        <FrameLayout
            android:layout_width="match_parent"
            android:layout_height="0dp"
            android:layout_weight="1">
        </FrameLayout>

                <!-- content fixated to the bottom of the screen -->
        <LinearLayout
            android:layout_width="match_parent"
            android:layout_height="wrap_content"
            android:orientation="horizontal">
                                   <!-- your bottom content -->
        </LinearLayout>
    </LinearLayout>
</ScrollView>
-
1это здорово - также, это «минимально инвазивный» и более интуитивный, чем подход RelativeLayout. Я бы дал больше одного голоса, если бы мог!
-
4Я использую ваше решение в своем приложении, но в моем случае я хочу, чтобы при появлении клавиатуры кнопки оставались в нижней части экрана (за клавиатурой). Thaks.
Вы можете сохранить свой первоначальный линейный макет, вставив относительный макет в линейный макет:
<LinearLayout
    android:orientation="vertical"
    android:layout_width="fill_parent"
    android:layout_height="fill_parent">

    <TextView android:text="welcome"
        android:id="@+id/TextView"
        android:layout_width="fill_parent"
        android:layout_height="wrap_content">
    </TextView>

    <RelativeLayout
        android:layout_width="match_parent"
        android:layout_height="match_parent">
        <Button android:text="submit"
            android:id="@+id/Button"
            android:layout_width="wrap_content"
            android:layout_height="wrap_content"
            android:layout_alignParentBottom="true"
            android:layout_alignParentRight="true">
        </Button>
        <EditText android:id="@+id/EditText"
            android:layout_width="match_parent"
            android:layout_height="wrap_content"
            android:layout_toLeftOf="@id/Button"
            android:layout_alignParentBottom="true">
        </EditText>
    </RelativeLayout>
</LinearLayout>
-
2Это грязный подход, поскольку он не очень модульный. Вы не должны иметь перекрывающихся макетов. Этот дизайн не будет работать, как только вы захотите изменить фон RelativeLayout или захотите увеличить любой из видов или добавить их.
Ответ выше (по Janusz) вполне корректен, но я лично не чувствую себя на 100% совместимым с RelativeLayouts, поэтому предпочитаю вводить "filler", пустой TextView, например:
<!-- filler -->
<TextView android:layout_height="0dip"
          android:layout_width="fill_parent"
          android:layout_weight="1" />
перед элементом, который должен находиться в нижней части экрана.
-
0Это расширится до оси X или Y. Задание 0dip для высоты сделает текстовое представление без какой-либо высоты? или будет расширяться настолько, насколько это возможно, просто как на оси х?
-
0Это расширяется по вертикали, потому что высота (вертикальная ось) установлена в 0, а вес в 1 (при условии, что другие элементы имеют нулевой вес).
Это также работает.
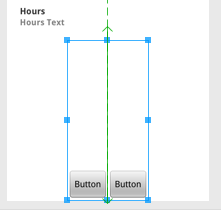
<LinearLayout
    android:id="@+id/linearLayout4"
    android:layout_width="wrap_content"
    android:layout_height="fill_parent"
    android:layout_below="@+id/linearLayout3"
    android:layout_centerHorizontal="true"
    android:orientation="horizontal"
    android:gravity="bottom"
    android:layout_alignParentBottom="true"
    android:layout_marginTop="20dp"
>

    <Button
        android:id="@+id/button1"
        android:layout_width="wrap_content"
        android:layout_height="wrap_content"
        android:text="Button"

    />

    <Button
        android:id="@+id/button2"
        android:layout_width="wrap_content"
        android:layout_height="wrap_content"
        android:text="Button"


    />

</LinearLayout>
-
12android: layout_alignParentBottom = "true" не имеет никакого эффекта, если только LinearLayout не вложен в RelativeLayout.
Вы можете сделать это с помощью LinearLayout или ScrollView. Иногда легче реализовать, чем RelativeLayout. Единственное, что вам нужно сделать, это добавить следующий вид до Представления, которые вы хотите выровнять в нижней части экрана:
<View
        android:layout_width="wrap_content"
        android:layout_height="0dp"
        android:layout_weight="1" />
Это создает пустой вид, заполняя пустое пространство и нажимая следующие представления в нижней части экрана.
Следуя элегантному решению Timores, я обнаружил, что следующее создает вертикальное заполнение вертикального LinearLayout и горизонтальное заполнение горизонтального LinearLayout:
<Space
    android:layout_width="match_parent"
    android:layout_height="match_parent"
    android:layout_weight="1" />
-
1Решение @ stevehs17 не работает во фрагменте
-
0@sepehr Должен быть другой фактор в случае, если вы обнаружили, что мое решение не работает. Я только что попробовал свое решение в макете фрагмента, и оно работает там же.
Вам даже не нужно вставлять второй макет relative внутри первого. Просто используйте android:layout_alignParentBottom="true" в Button и EditText.
-
0Просто обратите внимание, что хотя это работает с Button и EditText, если вы попытаетесь выровнять TableLayout таким образом, он не будет работать. Вы должны будете вложить его в другой RelativeLayout.
Если вы не хотите делать много изменений, вы можете просто поставить:
android:layout_weight="1"
для TextView с ID как @+id/TextView i.e
<TextView android:text="@string/welcome"
    android:id="@+id/TextView"
    android:layout_width="fill_parent"
    android:layout_height="wrap_content"
    android:layout_weight="1">
</TextView>
-
0Или добавьте окружающий LinearLayout с android: layout_weight = "1" - это также хорошо работает внутри ScrollView!
Создавая как HEADER, так и FOOTER, вот пример
[Layout XML]
<RelativeLayout
    xmlns:android="http://schemas.android.com/apk/res/android"
    xmlns:tools="http://schemas.android.com/tools"
    android:layout_width="fill_parent"
    android:layout_height="fill_parent"
    android:background="@color/backgroundcolor"
    tools:context=".MainActivity">

    <RelativeLayout
        android:layout_width="fill_parent"
        android:layout_height="40dp"
        android:background="#FF0000">
    </RelativeLayout>

    <RelativeLayout
        android:layout_width="fill_parent"
        android:layout_height="40dp"
        android:layout_alignParentBottom="true"
        android:background="#FFFF00">
    </RelativeLayout>

</RelativeLayout>
[Снимок экрана]
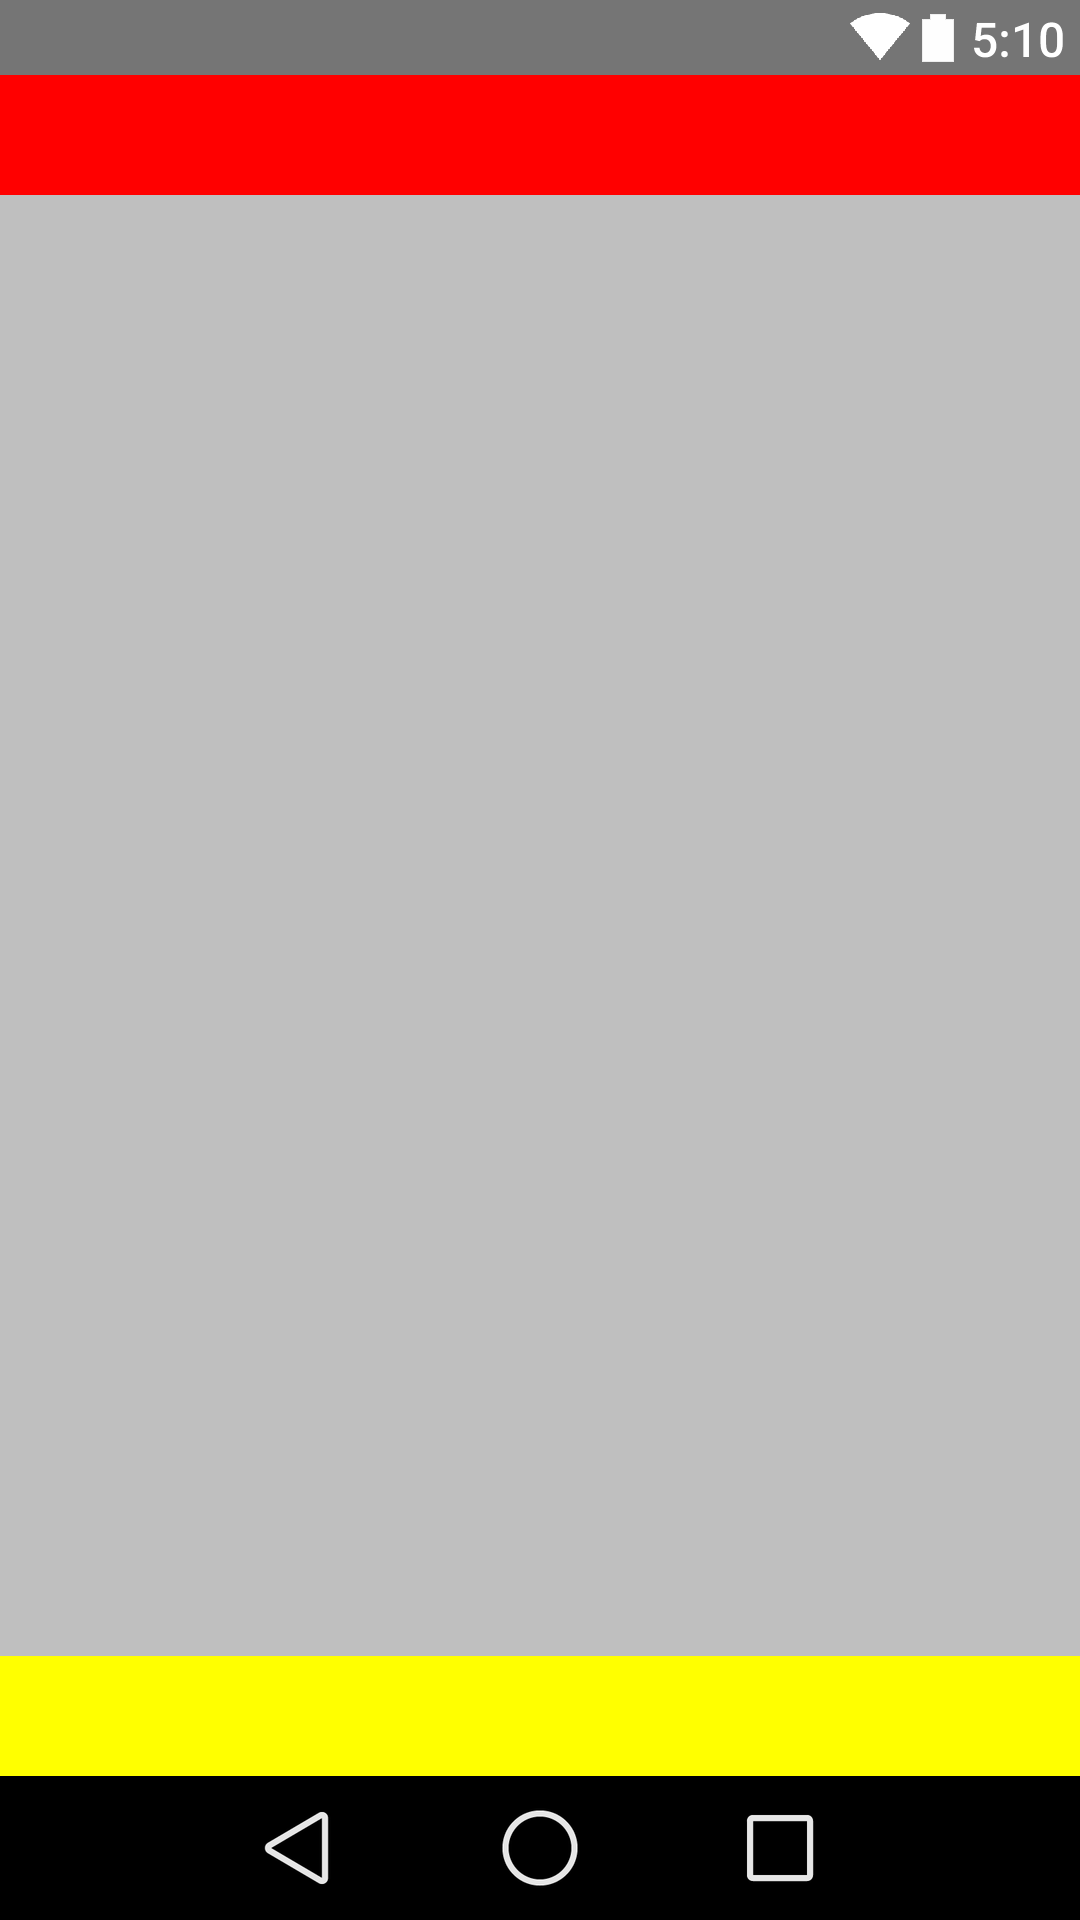
Надеюсь, это полезно. Спасибо!!
используйте нижнюю кнопку выравнивания кода, чтобы уменьшить ее рабочие
    <?xml version="1.0" encoding="utf-8"?>
<LinearLayout xmlns:android="http://schemas.android.com/apk/res/android"
    android:layout_width="match_parent"
    android:layout_height="match_parent"
    android:orientation="vertical" >

    <Button
        android:id="@+id/btn_back"
        android:layout_width="100dp"
        android:layout_height="80dp"
        android:text="Back" />

    <TextView
        android:layout_width="match_parent"
        android:layout_height="0dp"
        android:layout_weight="0.97"
        android:gravity="center"
        android:text="Payment Page" />

    <LinearLayout
        android:layout_width="match_parent"
        android:layout_height="wrap_content" >

        <EditText
            android:layout_width="wrap_content"
            android:layout_height="wrap_content"
            android:layout_weight="1"/>

        <Button
            android:layout_width="wrap_content"
            android:layout_height="wrap_content"
            android:text="Submit"/>
    </LinearLayout>

</LinearLayout>
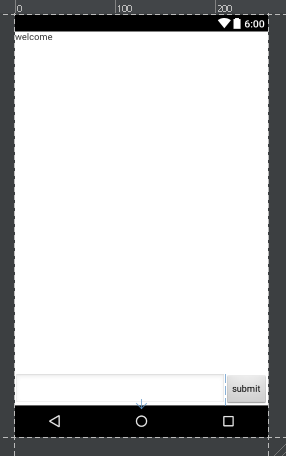
Если у вас есть такая иерархия:
<ScrollView>
  |-- <RelativeLayout>
    |-- <LinearLayout>
Сначала примените android:fillViewport="true" к ScrollView, а затем примените android:layout_alignParentBottom="true" к LinearLayout.
Это сработало для меня отлично.
<ScrollView
    android:layout_height="match_parent"
    android:layout_width="match_parent"
    android:scrollbars="none"
    android:fillViewport="true">
    <RelativeLayout
        android:layout_width="match_parent"
        android:layout_height="wrap_content">
        <LinearLayout
            android:orientation="horizontal"
            android:layout_width="match_parent"
            android:layout_height="wrap_content"
            android:gravity="center"
            android:id="@+id/linearLayoutHorizontal"
            android:layout_alignParentBottom="true">
        </LinearLayout>
    </RelativeLayout>
</ScrollView>
Используйте android:layout_alignParentBottom="true" в <RelativeLayout>.
Это определенно поможет.
-
1Это предполагает, что пользователь хочет использовать RelativeLayout.
1.Use ConstraintLayout в корневом макете
И установите app:layout_constraintBottom_toBottomOf="parent", чтобы Layout в нижней части экрана
<LinearLayout
    android:id="@+id/LinearLayout"
    android:layout_width="match_parent"
    android:layout_height="wrap_content"
    android:orientation="horizontal"
    app:layout_constraintBottom_toBottomOf="parent">
</LinearLayout>
2.Используйте FrameLayout в корневом макете
Просто установите android:layout_gravity="bottom" в вашем макете
<LinearLayout
    android:id="@+id/LinearLayout"
    android:layout_width="match_parent"
    android:layout_height="wrap_content"
    android:layout_gravity="bottom"
    android:orientation="horizontal">
</LinearLayout>
3.Используйте LinearLayout в корневом макете (android:orientation="vertical")
(1) Установите макет android:layout_weight="1" в верхней части макета
<TextView
    android:id="@+id/TextView"
    android:layout_width="match_parent"
    android:layout_height="0dp"
    android:layout_weight="1"
    android:text="welcome" />
(2) Установите дочерний элемент LinearLayout для android:layout_width="match_parent" android:layout_height="match_parent" android:gravity="bottom"
Основной атрибут ndroid:gravity="bottom", пусть дочерний вид в нижней части макета.
<LinearLayout
    android:id="@+id/LinearLayout"
    android:layout_width="match_parent"
    android:layout_height="match_parent"
    android:gravity="bottom"
    android:orientation="horizontal">
</LinearLayout>
4.Use RelativeLayout в корневом макете
И установите android:layout_alignParentBottom="true", чтобы макет в нижней части экрана
<LinearLayout
    android:id="@+id/LinearLayout"
    android:layout_width="match_parent"
    android:layout_height="wrap_content"
    android:layout_alignParentBottom="true"
    android:orientation="horizontal">
</LinearLayout>
OUTPUT
Вы можете просто дать вашему верхнему дочернему виду (TextView @+ id/TextView) атрибут:
android:layout_weight="1".
Это приведет к тому, что все остальные элементы будут внизу внизу.
Для такого случая всегда используйте RelativeLayouts. LinearLayout не предназначен для такого использования.
<?xml version="1.0" encoding="utf-8"?>
<RelativeLayout
xmlns:android="http://schemas.android.com/apk/res/android"
          android:id="@+id/db1_root"
          android:layout_width="match_parent"
          android:layout_height="match_parent"
          android:orientation="vertical" >

<LinearLayout
    android:layout_width="match_parent"
    android:layout_height="match_parent"
    android:orientation="vertical">

    <!-- Place your layout here -->

</LinearLayout>

<LinearLayout
    android:layout_width="match_parent"
    android:layout_height="wrap_content"
    android:layout_alignParentBottom="true"
    android:layout_gravity="bottom"
    android:orientation="horizontal"
    android:paddingLeft="20dp"
    android:paddingRight="20dp" >

    <Button
        android:id="@+id/setup_macroSavebtn"
        android:layout_width="0dp"
        android:layout_height="wrap_content"
        android:layout_weight="1"
        android:text="Save" />

    <Button
        android:id="@+id/setup_macroCancelbtn"
        android:layout_width="0dp"
        android:layout_height="wrap_content"
        android:layout_weight="1"
        android:text="Cancel" />

    </LinearLayout>

</RelativeLayout>
Это можно сделать и с линейной компоновкой Просто поставьте Height = 0dp и weight = 1 в макет выше, а тот, который вы хотите в нижней части, просто напишите height = wrap content и no weight. То, что он делает, это предоставление содержимого обложки для макета (тот, который содержит текст редактирования и кнопку), а затем тот, который имеет вес, занимает остальную часть макета. Я обнаружил это случайно.
Я использовал решение Janusz, но добавил добавление к последнему представлению, так как верхняя часть моего макета была ScrollView. ScrollView будет частично скрыт, поскольку он растет с контентом. Использование android: paddingBottom в последнем представлении помогает показать все содержимое в ScrollView.
Ещё вопросы
- 0vector.push_back () intellisense error
- 1Scrapy по предыдущим ссылкам
- 1Как сделать флип-анимацию с использованием XML
- 1Gradle, Вы не приняли лицензионные соглашения (Android SDK)
- 0Преобразование PHP в Python для получения смещения часового пояса
- 0Как вставить скобки в имя столбца моей таблицы SQL?
- 1Удаление строки запроса из ServletRequest после того, как она достигает сервлета / фильтра
- 0Добавление дополнительного класса с помощью ng-class
- 0Функция AngularJS ng-click не работает после содержимого информационного окна $ compile map
- 1Что означает выполнение микрозадачи после каждого обратного вызова?
- 0Угловой JS передает массив строк в директиву
- 1Свободный запрос за пределами просроченного соединения
- 1Отображение полей месяца в DatePickerDialog в числовом формате вместо алфавитного
- 0Что будет делать MySQL, если он обновляется одновременно
- 1Разбор XML-файла в Java с использованием DOM
- 1d3.js Двойной щелчок не освобождает узлы
- 1Android Constraint Layout alignemnt
- 0Использование QRegExValidator для QLineEdit
- 0Передача const char * в foo (char *)
- 1Как быстрее нажать на элемент несколько раз через селен, аппиум, Java и Android
- 1Ошибка в файле application-context-security.xml
- 1Python - запись в базу данных сервера SQL с использованием sqlalchemy из кадра данных pandas
- 1FirebaseApp по умолчанию не инициализируется в процессе (Ошибка)
- 1Discord.py Требуется ежедневная бонусная помощь
- 1Как обновить библиотеку Java-приложения во время выполнения?
- 0Можно ли использовать постоянное значение адреса памяти для другого времени? [Дубликат]
- 1Почему отдельные компоненты Vue компилируются в такие большие файлы?
- 1Как объединить неравномерный 2-мерный массив в 1-й массив (Java)
- 0преобразование текста: полная ширина не работает в Опере - HTML
- 1как получить заказы из компонента ordertools в atg или как протестировать apl orderlookup droplet
- 0Как поменять элемент H1 с H1 в другом документе, используя JQuery
- 0Как показать изображение загрузки во время рендеринга выпадающего списка (не во время загрузки данных, а во время рендеринга)
- 1Как я могу преобразовать pandas dataframe из необработанного текста в Python?
- 0JQuery обратный вызов, когда 3 метода завершены?
- 0Зависимый выпадающий не работает
- 0Javascript рекурсия не охватывает все элементы
- 0Объедините флажок jquery mobile в виде списка вместе со значком данных
- 1Нахождение дельты в трех перекрывающихся наборах в python
- 0Как я могу передать значение радиокнопки с идентификатором из db в текстовое поле
- 1Как я должен пройти через эти данные JSON?
- 0jQuery .prepend результаты JSON для нескольких div
- 0выбранный параметр не отображается в раскрывающемся списке Angularjs
- 1Невозможно создать экземпляр класса в 2 разных проектах библиотеки классов
- 1Асинхронная проблема с несколькими задачами
- 0Можем ли мы иметь автоматическую предустановку AspectRatio для выходных файлов из AWS Elastic Transcoder?
- 1Сеть d3 с несколькими ссылками в одном направлении
- 0Есть ли способ добавить HTML-код в атрибут 'alt', используя fancybox?
- 1Libgdx stage2d с другой камерой для HUD, как обрабатывать координаты?
- 1в чем причина добавления applicationContext-dao.xml и applicationContext-service.xml в контексте приложения
- 1Нажмите для удаленного хранилища
