Как бы я создал UIAlertView в Swift?
Я работал над созданием UIAlertView в Swift, но по какой-то причине я не могу правильно понять утверждение, потому что я получаю эту ошибку:
Не удалось найти перегрузку для 'init', который принимает предоставленные аргументы
Вот как я это написал:
let button2Alert: UIAlertView = UIAlertView(title: "Title", message: "message",
                     delegate: self, cancelButtonTitle: "OK", otherButtonTitles: nil)
Затем для вызова я использую:
button2Alert.show()
На данный момент это сбой, и я просто не могу понять синтаксис правильно.
31 ответ
Из класса UIAlertView:
//UIAlertView устарела. Вместо этого используйте UIAlertController с предпочитаемым стилем UIAlertControllerStyleAlert
На iOS 8 вы можете сделать это:
let alert = UIAlertController(title: "Alert", message: "Message", preferredStyle: UIAlertControllerStyle.Alert)
alert.addAction(UIAlertAction(title: "Click", style: UIAlertActionStyle.Default, handler: nil))
self.presentViewController(alert, animated: true, completion: nil)
Теперь UIAlertController - это единый класс для создания и взаимодействия с тем, что мы знали как UIAlertView и UIActionSheet в iOS 8.
Изменить: для обработки действий:
alert.addAction(UIAlertAction(title: "OK", style: .Default, handler: { action in
    switch action.style{
    case .Default:
        print("default")

    case .Cancel:
        print("cancel")

    case .Destructive:
        print("destructive")
    }
}}))
Редактировать для Swift 3:
let alert = UIAlertController(title: "Alert", message: "Message", preferredStyle: UIAlertControllerStyle.alert)
alert.addAction(UIAlertAction(title: "Click", style: UIAlertActionStyle.default, handler: nil))
self.present(alert, animated: true, completion: nil)
Редактировать для Swift 4.x:
let alert = UIAlertController(title: "Alert", message: "Message", preferredStyle: .alert)
alert.addAction(UIAlertAction(title: "OK", style: .default, handler: { action in
      switch action.style{
      case .default:
            print("default")

      case .cancel:
            print("cancel")

      case .destructive:
            print("destructive")


}}))
self.present(alert, animated: true, completion: nil)
-
3Где вы видели, что UIAlertView устарела? Я не вижу этого в документации?
-
8Cmd + Щелкните класс
UIAlertView, и комментарий находится прямо над объявлением класса.
Одна кнопка
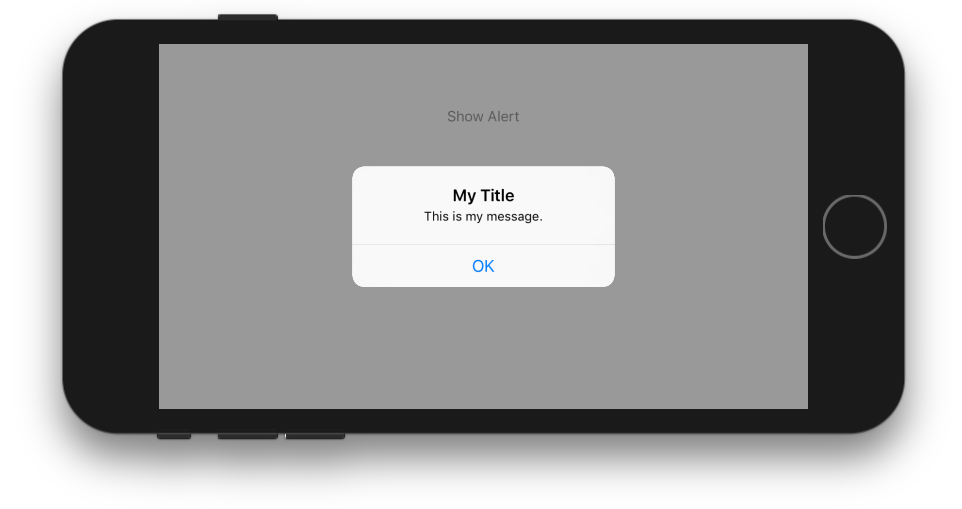
class ViewController: UIViewController {

    @IBAction func showAlertButtonTapped(_ sender: UIButton) {

        // create the alert
        let alert = UIAlertController(title: "My Title", message: "This is my message.", preferredStyle: UIAlertController.Style.alert)

        // add an action (button)
        alert.addAction(UIAlertAction(title: "OK", style: UIAlertAction.Style.default, handler: nil))

        // show the alert
        self.present(alert, animated: true, completion: nil)
    }
}
Две кнопки
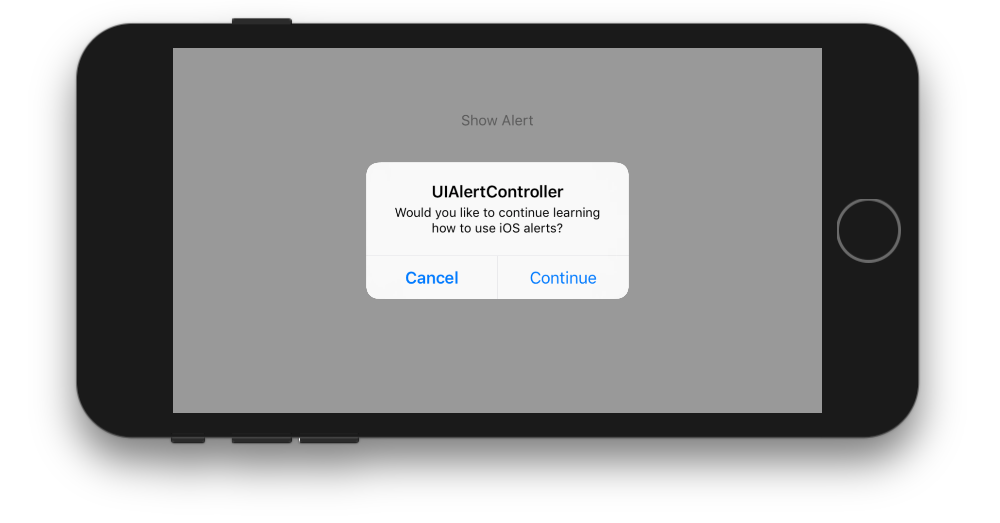
class ViewController: UIViewController {

    @IBAction func showAlertButtonTapped(_ sender: UIButton) {

        // create the alert
        let alert = UIAlertController(title: "UIAlertController", message: "Would you like to continue learning how to use iOS alerts?", preferredStyle: UIAlertController.Style.alert)

        // add the actions (buttons)
        alert.addAction(UIAlertAction(title: "Continue", style: UIAlertAction.Style.default, handler: nil))
        alert.addAction(UIAlertAction(title: "Cancel", style: UIAlertAction.Style.cancel, handler: nil))

        // show the alert
        self.present(alert, animated: true, completion: nil)
    }
}
Три кнопки
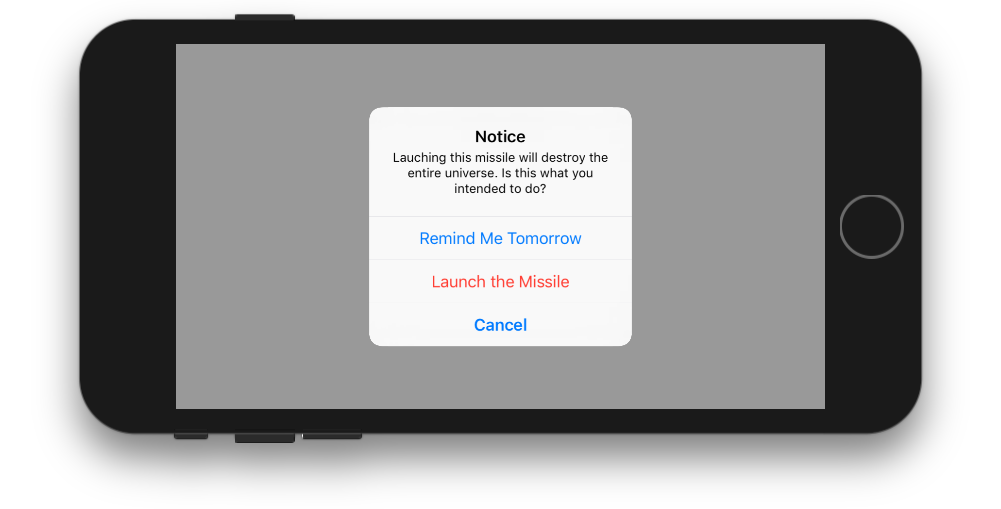
class ViewController: UIViewController {

    @IBAction func showAlertButtonTapped(_ sender: UIButton) {

        // create the alert
        let alert = UIAlertController(title: "Notice", message: "Lauching this missile will destroy the entire universe. Is this what you intended to do?", preferredStyle: UIAlertController.Style.alert)

        // add the actions (buttons)
        alert.addAction(UIAlertAction(title: "Remind Me Tomorrow", style: UIAlertAction.Style.default, handler: nil))
        alert.addAction(UIAlertAction(title: "Cancel", style: UIAlertActio.nStyle.cancel, handler: nil))
        alert.addAction(UIAlertAction(title: "Launch the Missile", style: UIAlertAction.Style.destructive, handler: nil))

        // show the alert
        self.present(alert, animated: true, completion: nil)
    }
}
Обработка нажатий кнопок
handler был nil в приведенных выше примерах. Вы можете заменить nil на замыкание, чтобы что-то делать, когда пользователь нажимает кнопку. Например:
alert.addAction(UIAlertAction(title: "Launch the Missile", style: UIAlertAction.Style.destructive, handler: { action in

    // do something like...
    self.launchMissile()

}))
Заметки
- Несколько кнопок не обязательно должны использовать разные типы
UIAlertAction.Style. Они все могут быть по.default. - Для более чем трех кнопок рассмотрите использование листа действий. Настройка очень похожа. Вот пример.
-
2есть ли свойство делегата в UIAlertController? в UIAlertView есть свойство делегата, которое мы иногда устанавливаем для себя. Есть ли что-нибудь подобное в UIAlertController ?? Я новичок, пожалуйста, помогите мне
Вы можете создать UIAlert с помощью стандартного конструктора, но "устаревшее", похоже, не работает:
let alert = UIAlertView()
alert.title = "Alert"
alert.message = "Here a message"
alert.addButtonWithTitle("Understood")
alert.show()
-
8UIAlertView устарела. Вместо этого используйте UIAlertController с предпочитаемым стилем UIAlertControllerStyleAlert.
-
15@Zorayr UIAlertController доступен только с iOS 8 и более поздних версий, также укажите это при предложении его использования. Есть ситуации, когда поддержка iOS7 все еще желательна, и люди могут пропустить проблему. Устаревание не означает «никогда больше не используйте это».
Нажмите Просмотр
@IBAction func testClick(sender: UIButton) {

  var uiAlert = UIAlertController(title: "Title", message: "Message", preferredStyle: UIAlertControllerStyle.Alert)
  self.presentViewController(uiAlert, animated: true, completion: nil)

  uiAlert.addAction(UIAlertAction(title: "Ok", style: .Default, handler: { action in
   println("Click of default button")
  }))

  uiAlert.addAction(UIAlertAction(title: "Cancel", style: .Cancel, handler: { action in
   println("Click of cancel button")
  }))

}
Готово с двумя кнопками OK и Отмена
Если вы ориентируетесь на iOS 7 и 8, вам нужно что-то подобное, чтобы убедиться, что вы используете правильный метод для каждой версии, потому что UIAlertView устарел в iOS 8, но UIAlertController недоступен в iOS 7:
func alert(title: String, message: String) {
    if let getModernAlert: AnyClass = NSClassFromString("UIAlertController") { // iOS 8
        let myAlert: UIAlertController = UIAlertController(title: title, message: message, preferredStyle: .Alert)
        myAlert.addAction(UIAlertAction(title: "OK", style: .Default, handler: nil))
        self.presentViewController(myAlert, animated: true, completion: nil)
    } else { // iOS 7
        let alert: UIAlertView = UIAlertView()
        alert.delegate = self

        alert.title = title
        alert.message = message
        alert.addButtonWithTitle("OK")

        alert.show()
    }
}
-
0Или вы можете сэкономить время и просто использовать
UIAlertViewпока не прекратите поддержку iOS 7. Apple не отклонит ваше приложение за это. -
2Устаревание не означает «не используйте это» или то, что это будет «неправильный метод», это просто означает, что оно не будет работать позже. Нет необходимости специально использовать UIAlertController на iOS8, если нужны только базовые оповещения. Они будут работать как раньше. Есть много API, которые устарели в iOS4 или 5 и до сих пор работают в iOS8. Но, конечно, приложения, ориентированные на более высокий уровень iOS, не должны их использовать, и поэтому есть предупреждение об устаревании.
Просто не предоставляйте otherButtonTitles в конструкторе.
let alertView = UIAlertView(title: "Oops!", message: "Something
happened...", delegate: nil, cancelButtonTitle: "OK")

alertView.show()
Но я согласен с Oscar, этот класс устарел в iOS 8, поэтому не будет никакого использования UIAlertView, если вы используете приложение только для iOS 8. В противном случае код будет работать.
Показать UIAlertView в быстром языке: -
Протокол UIAlertViewDelegate
let alert = UIAlertView(title: "alertView", message: "This is alertView", delegate:self, cancelButtonTitle:"Cancel", otherButtonTitles: "Done", "Delete")
alert.show()
Показать UIAlertViewController в быстром языке: -
let alert = UIAlertController(title: "Error", message: "Enter data in Text fields", preferredStyle: UIAlertControllerStyle.Alert)
alert.addAction(UIAlertAction(title: "OK", style: UIAlertActionStyle.Default, handler: nil))
self.presentViewController(alert, animated: true, completion: nil)
-
0Это отвечает на вопрос прямо и правильно
С расширением протокола Swift 2 вы можете сделать протокол, который предоставляет реализацию по умолчанию вашим контроллерам просмотров:
ShowsAlert.swift
import UIKit

protocol ShowsAlert {}

extension ShowsAlert where Self: UIViewController {
    func showAlert(title: String = "Error", message: String) {
        let alertController = UIAlertController(title: title, message: message, preferredStyle: .Alert)
        alertController.addAction(UIAlertAction(title: "Ok", style: .Default, handler: nil))
        presentViewController(alertController, animated: true, completion: nil)
    }
}
ViewController.swift
class ViewController: UIViewController, ShowsAlert {
    override func viewDidLoad() {
        super.viewDidLoad()
        showAlert(message: "Hey there, I am an error message!")
    }
}
-
1Работает отлично. Для Swift3 измените «presentViewController» на «присутствует».
Я нашел этот,
var alertView = UIAlertView();
alertView.addButtonWithTitle("Ok");
alertView.title = "title";
alertView.message = "message";
alertView.show();
Нехорошо, но он работает:)
Update:
но я нашел в файле заголовка как:
extension UIAlertView {
    convenience init(title: String, message: String, delegate: UIAlertViewDelegate?, cancelButtonTitle: String?, otherButtonTitles firstButtonTitle: String, _ moreButtonTitles: String...)
}
кто-то может это объяснить.
-
0Очевидно, UIAlertView устарел в iOS 8, и теперь мы используем UIAlertController с предпочтительным стилем UIAlertControllerStyleAlert.
-
6Если вы запускаете приложение, которое должно быть обратно совместимо с iOS7.1, и пишете его в Swift, UIAlertController приведет к сбою целевого устройства. Вам необходимо поддерживать устаревшие UIAlertViews для iOS7.
В Swift 4.2 и Xcode 10
Способ 1:
ПРОСТОЕ ПРЕДУПРЕЖДЕНИЕ
let alert = UIAlertController(title: "Your title", message: "Your message", preferredStyle: .alert)

     let ok = UIAlertAction(title: "OK", style: .default, handler: { action in
     })
     alert.addAction(ok)
     let cancel = UIAlertAction(title: "Cancel", style: .default, handler: { action in
     })
     alert.addAction(cancel)
     DispatchQueue.main.async(execute: {
        self.present(alert, animated: true)
})
Способ 2:
ALERT с общим классом
Если вы хотите стиль общего класса (пишите один раз, используйте где угодно)
import UIKit
class SharedClass: NSObject {//This is shared class
static let sharedInstance = SharedClass()

    //Show alert
    func alert(view: UIViewController, title: String, message: String) {
        let alert = UIAlertController(title: title, message: message, preferredStyle: .alert)
        let defaultAction = UIAlertAction(title: "OK", style: .default, handler: { action in
        })
        alert.addAction(defaultAction)
        DispatchQueue.main.async(execute: {
            view.present(alert, animated: true)
        })
    }

    private override init() {
    }
}
Теперь вызывайте оповещения вот так в каждой посуде
SharedClass.SharedInstance.alert(view: self, title: "Your title here", message: "Your message here")
Способ 3:
НАСТОЯЩИЙ АЛЬЕРТ ВЕРХ ВСЕХ ОКОН
Если вы хотите представить предупреждение поверх всех просмотров, используйте этот код
func alertWindow(title: String, message: String) {
    DispatchQueue.main.async(execute: {
        let alertWindow = UIWindow(frame: UIScreen.main.bounds)
        alertWindow.rootViewController = UIViewController()
        alertWindow.windowLevel = UIWindowLevelAlert + 1

        let alert2 = UIAlertController(title: title, message: message, preferredStyle: .alert)
        let defaultAction2 = UIAlertAction(title: "OK", style: .default, handler: { action in
        })
        alert2.addAction(defaultAction2)

        alertWindow.makeKeyAndVisible()

        alertWindow.rootViewController?.present(alert2, animated: true, completion: nil)
    })
}
Вызов функции
SharedClass.sharedInstance.alertWindow(title:"This your title", message:"This is your message")
Способ 4:
Оповещение с расширением
extension  UIViewController {

    func showAlert(withTitle title: String, withMessage message:String) {
        let alert = UIAlertController(title: title, message: message, preferredStyle: .alert)
        let ok = UIAlertAction(title: "OK", style: .default, handler: { action in
        })
        let cancel = UIAlertAction(title: "Cancel", style: .default, handler: { action in
        })
        alert.addAction(ok)
        alert.addAction(cancel)
        DispatchQueue.main.async(execute: {
            self.present(alert, animated: true)
        })
    }
}
Теперь звоните так
//Call showAlert function in your class
@IBAction func onClickAlert(_ sender: UIButton) {
    showAlert(withTitle:"Your Title Here", withMessage: "YourCustomMessageHere")
}
Способ 5:
ALERT с текстовыми полями
Если вы хотите добавить текстовые поля для оповещения.
//Global variables
var name:String?
var login:String?

//Call this function like this:  alertWithTF()
//Add textfields to alert
func alertWithTF() {

    let alert = UIAlertController(title: "Login", message: "Enter username&password", preferredStyle: .alert)
    // Login button
    let loginAction = UIAlertAction(title: "Login", style: .default, handler: { (action) -> Void in
        // Get TextFields text
        let usernameTxt = alert.textFields![0]
        let passwordTxt = alert.textFields![1]
        //Asign textfileds text to our global varibles
        self.name = usernameTxt.text
        self.login = passwordTxt.text

        print("USERNAME: \(self.name!)\nPASSWORD: \(self.login!)")
    })

    // Cancel button
    let cancel = UIAlertAction(title: "Cancel", style: .destructive, handler: { (action) -> Void in })

    //1 textField for username
    alert.addTextField { (textField: UITextField) in
        textField.placeholder = "Enter username"
        //If required mention keyboard type, delegates, text sixe and font etc...
        //EX:
        textField.keyboardType = .default
    }

    //2nd textField for password
    alert.addTextField { (textField: UITextField) in
        textField.placeholder = "Enter password"
        textField.isSecureTextEntry = true
    }

    // Add actions
    alert.addAction(loginAction)
    alert.addAction(cancel)
    self.present(alert, animated: true, completion: nil)

}
Для SWIFT4, я думаю, расширение UIViewController и создание элемента управления многоразового подтверждения является наиболее элегантным способом.
Вы можете расширить UIViewController как UIViewController ниже:
extension UIViewController {

func AskConfirmation (title:String, message:String, completion:@escaping (_ result:Bool) -> Void) {
    let alert = UIAlertController(title: title, message: message, preferredStyle: UIAlertControllerStyle.alert)
    self.present(alert, animated: true, completion: nil)

    alert.addAction(UIAlertAction(title: "Ok", style: .default, handler: { action in
        completion(true)
    }))

    alert.addAction(UIAlertAction(title: "Cancel", style: .cancel, handler: { action in
        completion(false)
    }))
  }
}
Тогда вы можете использовать его в любое время:
 AskConfirmation(title: "YOUR MESSAGE TITLE", message: "YOUR MESSAGE") { (result) in
        if result { //User has clicked on Ok

        } else { //User has clicked on Cancel

        }
    }
Swift 3
Ниже приведен простой пример создания простого предупреждения с помощью одной кнопки с Swift 3.
let alert = UIAlertController(title: "Title",
                              message: "Message",
                              preferredStyle: .alert)
alert.addAction(UIAlertAction(title: "Ok", style: .default))
present(alert, animated: true)
В приведенном выше примере обратный вызов дескриптора действия был опущен, так как по умолчанию поведение предупреждения с одной кнопкой исчезает при нажатии кнопки.
Вот как создать другое действие, которое можно добавить в alert с помощью alert.addAction(action) ". Различные стили -.default,.destructive и .cancel.
let action = UIAlertAction(title: "Ok", style: .default) { action in
    // Handle when button is clicked
}
Я сделал одноэлементный класс, чтобы его было удобно использовать из любого места в вашем приложении: https://github.com/Swinny1989/Swift-Popups
Затем вы можете создать всплывающее окно с несколькими кнопками, например:
Popups.SharedInstance.ShowAlert(self, title: "Title goes here", message: "Messages goes here", buttons: ["button one" , "button two"]) { (buttonPressed) -> Void in
    if buttonPressed == "button one" {
      //Code here
    } else if buttonPressed == "button two" {
        // Code here
    }
}
или всплывающее окно с одной кнопкой, как это:
Popups.SharedInstance.ShowPopup("Title goes here", message: "Message goes here.")
-
0Благодарю. Я отправляю туда какую-то проблему
-
1Привет, @ Swinny89. Большое спасибо, что поделились этим решением с нами! Я застрял с закрытием, и ты только что спас меня!
У меня есть еще один трюк. Предположим, у вас есть 5 классов, в которых будет применяться предупреждение о выходе из системы. Попробуйте с быстрым расширением класса.
Файл - новый - класс Swift - назовите его.
Добавьте следующее:
public extension UIViewController
{

    func makeLogOutAlert()
    {
        var refreshAlert = UIAlertController(title: "Log Out", message: "Are You Sure to Log Out ? ", preferredStyle: UIAlertControllerStyle.Alert)

        refreshAlert.addAction(UIAlertAction(title: "Confirm", style: .Default, handler: { (action: UIAlertAction!) in
            self.navigationController?.popToRootViewControllerAnimated(true)
        }))

        refreshAlert.addAction(UIAlertAction(title: "Cancel", style: .Default, handler: { (action: UIAlertAction!) in
            refreshAlert .dismissViewControllerAnimated(true, completion: nil)
        }))

        presentViewController(refreshAlert, animated: true, completion: nil)
    }
}
Внедрить с помощью: self.makeLogOutAlert(). Надеюсь, что это поможет.
    class Preview: UIViewController , UIAlertViewDelegate
    {
        @IBAction func MoreBtnClicked(sender: AnyObject)
        {
            var moreAlert=UIAlertView(title: "Photo", message: "", delegate: self, cancelButtonTitle: "No Thanks!", otherButtonTitles: "Save Image", "Email", "Facebook", "Whatsapp" )
            moreAlert.show()
            moreAlert.tag=111;
        }

        func alertView(alertView: UIAlertView, didDismissWithButtonIndex buttonIndex: Int)
        {
            if alertView.tag==111
            {
                if buttonIndex==0
                {
                    println("No Thanks!")
                }
                else if buttonIndex==1
                {
                    println("Save Image")
                }
                else if buttonIndex == 2
                {
                    println("Email")
                }
                else if buttonIndex == 3
                {
                    println("Facebook")
                }
                else if buttonIndex == 4
                {
                    println("Whatsapp")
                }
            }
        }
    }
-
0Просто писать кусок кода не очень полезно. При ответе на любой вопрос (особенно старый вопрос с несколькими ответами, включая принятый ответ), пожалуйста, напишите больше, чем кусок кода. Пожалуйста, добавьте объяснение того, что делает ваш код, как он отвечает на вопрос и чем он отличается (или лучше) от других ответов.
-
0Фантастический ответ, Джаеш, спасибо за это.
Я получил следующий код инициализации UIAlertView для компиляции без ошибок (я считаю, что последняя, вариабельная часть, возможно, сложна). Но я должен был убедиться, что класс self (который я передаю как делегат) принимал протокол UIAlertViewDelegate для ошибок компиляции:
let alertView = UIAlertView(
                  title: "My Title",
                  message: "My Message",
                  delegate: self,
                  cancelButtonTitle: "Cancel",
                  otherButtonTitles: "OK"
                )
Кстати, это ошибка, которую я получал (с Xcode 6.4):
Невозможно найти инициализатор для типа 'UIAlertView', который принимает список аргументов типа '(title: String, message: String, delegate: MyViewController, cancelButtonTitle: String, otherButtonTitles: String) '
Как уже упоминалось, вам нужно перейти на UIAlertController, если вы можете настроить таргетинг на iOS 8.x+. Для поддержки iOS 7 используйте код выше (iOS 6 не поддерживается Swift).
SWIFT 4: Просто создайте расширение для UIViewController следующим образом:
extension  UIViewController {
    func showSuccessAlert(withTitle title: String, andMessage message:String) {
        let alert = UIAlertController(title: title, message: message,
                                  preferredStyle: UIAlertController.Style.alert)
        alert.addAction(UIAlertAction(title: "OK".localized, style:
        UIAlertAction.Style.default, handler: nil))
        self.present(alert, animated: true, completion: nil)
    }
}
Теперь в вашем ViewController напрямую вызовите вышеуказанную функцию, как если бы они были предоставлены UIViewController.
    yourViewController.showSuccessAlert(withTitle:
      "YourTitle", andMessage: "YourCustomTitle")
-
0Как правило, ответы гораздо полезнее, если они включают в себя объяснение того, для чего предназначен код, и почему это решает проблему, не представляя других. Спасибо за то, что улучшили ссылочную ценность ответа и сделали его более понятным!
 let alertController = UIAlertController(title: "Select Photo", message: "Select atleast one photo", preferredStyle: .alert)
    let action1 = UIAlertAction(title: "From Photo", style: .default) { (action) in
        print("Default is pressed.....")
    }
    let action2 = UIAlertAction(title: "Cancel", style: .cancel) { (action) in
        print("Cancel is pressed......")
    }
    let action3 = UIAlertAction(title: "Click new", style: .default) { (action) in
        print("Destructive is pressed....")

    }
    alertController.addAction(action1)
    alertController.addAction(action2)
    alertController.addAction(action3)
    self.present(alertController, animated: true, completion: nil)

}
в xcode 9
let alert = UIAlertController(title: "Alert", message: "message", preferredStyle: UIAlertControllerStyle.alert)
alert.addAction(UIAlertAction(title: "Ok", style: UIAlertActionStyle.default, handler: nil))
self.present(alert, animated: true, completion: nil)
Используйте этот код для отображения alertview
  let alertController = UIAlertController(title: "Hello  Coders", message: "your alert message", preferredStyle: .Alert)
        let defaultAction = UIAlertAction(title: "Close Alert", style: .Default, handler: nil)
        alertController.addAction(defaultAction)

        presentViewController(alertController, animated: true, completion: nil)
@IBAction func Alert(sender: UIButton) {

    var alertView:UIAlertView = UIAlertView()
    alertView.title = "Alert!"
    alertView.message = "Message"
    alertView.delegate = self
    alertView.addButtonWithTitle("OK")

    alertView.show()

}
Попробуйте это
Причина, по которой это не работает, потому что некоторая ценность, которую вы передали функции, неверна. swift не нравится Objective-C, вы можете поместить nil в аргументы, которые являются типами классов без каких-либо ограничений (может быть). Аргумент otherButtonTitles определяется как необязательный, его тип не имеет (?) В конце. поэтому вы должны передать ему конкретное значение.
попробуй это. Поместите сильфон в кнопку.
let alert = UIAlertController(title: "Your_Title_Text", message: "Your_MSG", preferredStyle: UIAlertControllerStyle.alert)
alert.addAction(UIAlertAction(title: "Your_Text", style: UIAlertActionStyle.default, handler: nil))
self.present(alert, animated:true, completion: nil)
Ниже приведен многократно используемый код для представления предупреждений и таблицы действий. Просто напишите одну строку, чтобы показать предупреждение в любом месте приложения
class AlertView{

    static func show(title:String? = nil,message:String?,preferredStyle: UIAlertControllerStyle = .alert,buttons:[String] = ["Ok"],completionHandler:@escaping (String)->Void){
        let alert = UIAlertController(title: title, message: message, preferredStyle: preferredStyle)

        for button in buttons{

            var style = UIAlertActionStyle.default
            let buttonText = button.lowercased().replacingOccurrences(of: " ", with: "")
            if buttonText == "cancel"{
                style = .cancel
            }
            let action = UIAlertAction(title: button, style: style) { (_) in
                completionHandler(button)
            }
            alert.addAction(action)
        }

        DispatchQueue.main.async {
            if let app = UIApplication.shared.delegate as? AppDelegate, let rootViewController = app.window?.rootViewController {
                rootViewController.present(alert, animated: true, completion: nil)
            }

        }
    }
}
Использование :
class ViewController: UIViewController {

    override func viewWillAppear(_ animated: Bool) {
        AlertView.show(title: "Alert", message: "Are you sure ?", preferredStyle: .alert, buttons: ["Yes","No"]) { (button) in
            print(button)
        }
    }

}
  // UIAlertView is deprecated. Use UIAlertController
  // title = title of the alert view.
  // message = Alert message you want to show.
  // By tap on "OK" , Alert view will dismiss.

 UIAlertView(title: "Alert", message: "Enter Message here.", delegate: nil, cancelButtonTitle: "OK").show()
-
0Можете ли вы добавить объяснение к коду, который вы разместили? Как и сейчас, ваш ответ на самом деле не считается хорошим ответом по правилам SO.
-
0представление предупреждений изменилось в swift 4.use контроллер предупреждений
//Общий класс для UIAlertView
//MARK:- MODULES
import Foundation
import UIKit

//MARK:- CLASS
class Alert  : NSObject{

static let shared = Alert()

var okAction : AlertSuccess?
typealias AlertSuccess = (()->())?
var alert: UIAlertController?

/** show */
public func show(title : String?, message : String?, viewController : UIViewController?, okAction : AlertSuccess = nil) {

    let version : NSString = UIDevice.current.systemVersion as NSString
    if  version.doubleValue >= 8 {
        alert = UIAlertController(title: title, message: message, preferredStyle:.alert)
        alert?.addAction(UIAlertAction(title: "OK", style: .default, handler: { (action: UIAlertAction) in

            if let okAction = okAction {
                okAction()
            }
        }))
        viewController?.present(alert ?? UIAlertController(), animated:true, completion:nil);
    }
}

/** showWithCancelAndOk */
public func showWithCancelAndOk(title : String, okTitle : String, cancelTitle : String, message : String, viewController : UIViewController?, okAction : AlertSuccess = nil, cancelAction : AlertSuccess = nil) {
    let version:NSString = UIDevice.current.systemVersion as NSString;

    if  version.doubleValue >= 8 {
        alert = UIAlertController(title: title, message: message, preferredStyle:.alert)

        alert?.addAction(UIAlertAction(title: cancelTitle, style: .default, handler: { (action: UIAlertAction) in

            if let cancelAction = cancelAction {
                cancelAction()
            }
        }))
        alert?.addAction(UIAlertAction(title: okTitle, style: .default, handler: { (action: UIAlertAction) in

            if let okAction = okAction {
                okAction()
            }
        }))
        viewController?.present(alert!, animated:true, completion:nil);
    }
}

/** showWithTimer */
public func showWithTimer(message : String?, viewController : UIViewController?) {

    let version : NSString = UIDevice.current.systemVersion as NSString
    if  version.doubleValue >= 8 {
        alert = UIAlertController(title: "", message: message, preferredStyle:.alert)
        viewController?.present(alert ?? UIAlertController(), animated:true, completion:nil)
        let when = DispatchTime.now() + 1
        DispatchQueue.main.asyncAfter(deadline: when){
            self.alert?.dismiss(animated: true, completion: nil)
        }
    }
}
}
Использование: -
Alert.shared.show(title: "No Internet Connection", message: "The internet connection appers to be offline.", viewController: self) //without ok action

Alert.shared.show(title: "No Internet Connection", message: "The internet connection appers to be offline.", viewController: self, okAction: {
                            //ok action
                        }) // with ok action

Alert.shared.show(title: "No Internet Connection", message: "The internet connection appers to be offline.", viewController: self, okAction: {
                            //ok action
}, cancelAction: {
 //cancel action
}) //with cancel and ok action

Alert.shared.showWithTimer(message : "This is an alert with timer", viewController : self) //with timer
на IOS 9 вы можете сделать это
let alert = UIAlertController(title: "Alert", message: "Message", preferredStyle: UIAlertControllerStyle.alert)
alert.addAction(UIAlertAction(title: "Click", style: UIAlertActionStyle.default, handler: nil))
self.present(alert, animated: true, completion: nil)
Старый путь: UIAlertView
let alertView = UIAlertView(title: "Default Style", message: "A standard alert.", delegate: self, cancelButtonTitle: "Cancel", otherButtonTitles: "OK")
alertView.alertViewStyle = .Default
alertView.show()

// MARK: UIAlertViewDelegate

 func alertView(alertView: UIAlertView, clickedButtonAtIndex buttonIndex: Int) {
 switch buttonIndex {

    // ...
   }
  }
Новый способ: UIAlertController
let alertController = UIAlertController(title: "Default Style", message: "A standard alert.", preferredStyle: .Alert)

let cancelAction = UIAlertAction(title: "Cancel", style: .Cancel) { (action) in
// ...
 }
 alertController.addAction(cancelAction)

 let OKAction = UIAlertAction(title: "OK", style: .Default) { (action) in
// ...
 }
 alertController.addAction(OKAction)
 self.presentViewController(alertController, animated: true) {
 // ...
}
Вот довольно простая функция AlertView в Swift:
class func globalAlertYesNo(msg: String) {
        let alertView = UNAlertView(title: "Title", message: msg)

        alertView.messageAlignment = NSTextAlignment.Center
        alertView.buttonAlignment  = UNButtonAlignment.Horizontal

        alertView.addButton("Yes", action: {

            print("Yes action")

        })

        alertView.addButton("No", action: {

            print("No action")

        })

        alertView.show()

    }
Вам нужно передать сообщение как строку, в которой вы используете эту функцию.
Вот забавный пример в Swift:
private func presentRandomJoke() {
  if let randomJoke: String = jokesController.randomJoke() {
    let alertController: UIAlertController = UIAlertController(title:nil, message:randomJoke, preferredStyle: UIAlertControllerStyle.Alert)
    alertController.addAction(UIAlertAction(title:"Done", style:UIAlertActionStyle.Default, handler:nil))
    presentViewController(alertController, animated:true, completion:nil)
  }
}
SWIFT 4.X
    let alert = UIAlertController(title: "user entered title", message: "user entered message", preferredStyle: .alert)
    alert.addAction(UIAlertAction(title: "OK", style: .default, handler: { action in
        print("Okay'd")
    }))
    alert.addAction(UIAlertAction(title: "Cancel", style: .default, handler: { action in
        print("cancelled")
    }))
    self.present(alert, animated: true, completion: nil)
-
0Добавил это в ответ, чтобы показать, как выполнять несколько действий (например, OK / Отмена)
-
1Не публикуйте повторяющиеся ответы, удалите их ...
Ещё вопросы
- 1Огромная задержка при подключении в Java
- 1Невозможно определить тип SQL для ... при создании таблиц с LinQ
- 1Развертывание проекта Java на сервере JBoss
- 0передача массива в предложении where в соединении
- 0Jquery на эквивалент в версии 1.3.2
- 1Последнее обновление Chrome до 2017 года - как отключить двойное касание ZOOM
- 1Строковый параметр слишком длинный. извлечение данных из базы данных в шаблон слова
- 1Класс Mock Abstract с использованием Moq
- 1Попытка реализовать аутентификацию JWT в узле. Получение несанкционированного доступа на защищенных маршрутах
- 0Концепция полиморфизма C ++
- 0Ошибка: «Ответ» не был объявлен в этой области
- 0Hibernate выберите после вставки
- 1Vue директива после V-для
- 0как преобразовать объект в массив, исключая зависимости в php
- 0Сохранить результат в Map в C ++, затем повторить и распечатать?
- 1как отключить кнопку на основе результата функции JavaScript
- 0Угловое извлечение всех заголовочных файлов html в один файл
- 0Должен ли я считать значения RGB пикселя одним значением?
- 1Как получить пользователей из списка LiveData для отображения в Spinner с использованием базы данных комнат
- 0JQuery, как взять ссылку на дочерний элемент и использовать его где-нибудь еще
- 1Как разрешить внешний контакт для BottomSheetDialog?
- 1Объединение листов Excel в несколько циклов
- 0Перемещение нижнего колонтитула, которое исчезает, когда вы достигаете конца
- 1System.Windows.Forms.WebBrowser Проблема с доступом к сценарию
- 1Ошибка при преобразовании кадра данных pandas в спарк Dataframe
- 0Чтение еще одной строки при разборе CSV в PHP
- 1Заполнение объекта вложенного списка модели на основе выбора флажков в ASP.NET MVC
- 1Панель прокрутки и макет панели
- 0Получение и перемещение последней записи в каждой группе
- 0Как изменить кодировку веб-страницы, полученной с помощью Simple HTML DOM?
- 0Проблемы создания матриц из пользовательского ввода в C ++
- 0Использование контроллеров, добавленных маршрутами, для объявления переменных $ scope в Angular JS?
- 0Компилятор C ++ имеет противоречивые жалобы на перегрузку оператора <<
- 1Windows Phone - любой шаблон дизайна формы?
- 1Почему мой список выходит из области видимости в сообщении WCF?
- 1при запросе загрузки файл остается на 0 байтов?
- 0Как использовать Backbone на нескольких страницах?
- 1Почему текст Snackbar исчезает, если текст слишком длинный?
- 0Любой другой способ объединить PayPal с IPN?
- 1Совместимость с Android + FTDI FT232H
- 0C ++ Array передается по ссылке, но как это понять?
- 1Spring Websocket несколько серверов Tomcat
- 1Кнопка не видна из-за DataGrid
- 0выбрать, вставить и зациклить строки в cronjob
- 1Как закрыть терминал при запуске приложения торнадо?
- 0Как передать объект в качестве параметра функции скрипта Java на onClick
- 0HTML несколько уровней развернуть свернуть для таблицы с большим количеством строк медленно
- 1Lwjgl, как упростить карту высот, чтобы получить более высокие fps?
- 1Запись в существующий XML-файл без замены его содержимого (XmlWriter)
- 1Смесь классов и перечислений

UIAlertViewиUIActionSheetбыли замененыUIAlertControllerв iOS 8, вы смотрели на это?selfпринимает протоколUIAlertViewDelegate(рекомендуемый способ сделать это в Swift - с расширением).